
Project Info
This solo project is a First Person Shooter level that I created within Unreal Engine. I named the level Foundry.
You play as a military contractor who has been hired to investigate a foundry. Their production output has suddenly stopped, and you are sent to find out why. The setting is near future, and Earth is running out of natural resources. The foundry was using rare experimental chemicals and compounds in an effort to create metal casings that could withstand new forms of fuel. The people who hired you fear that the place could have been overtaken by a gang now using it as a base of operations, however the truth is much more darker. An element used in the melting process released dangerous toxins into the air when it melted, toxins which causes peoples behaviour/personality to change when exposed to it for a long duration of time. In this case all of the foundry staff had turned into violent, rage filled beings, killing some of the others and vandalising the foundry.
Skills utilised:
Level Design - Game Design - Scripting - Conceptualisation
Full Playthrough
Final Keyshots


Breakdown & Analysis
1. Moodboard


I wanted to go for a gritty, run down, industrial feel with this level. I also wanted it to seem like a desolate and lonely area – almost post-apocalyptic – to reflect the current state of Earth in the game world. To emphasise this, I decided to set it out in the desert and to give the lighting a dusty tint overall. The mood board above shows the kind of atmosphere I am going for with this level.
I decided to make the foundry work with rare chemicals/compounds so it would not only fit the narrative, but that it would also give the foundry an excuse to have such high end security. This then vastly provided me with more opportunities to experiment with the level, adding in a variety of traps and areas for the player to bypass. I incorporated this into my initial top down design for the level, which can be seen below.
2. Initial Top Down Design

The initial design concept is similar to the end product; however I made some changes in the final level to streamline the overall process. A key change I made was to merge the design of Upstairs and Upstairs 2 in Foundry 1 together, and instead incorporate both of their design mechanics onto one floor – which would now be Upstairs - instead of two. I then cut Foundry 2 – which would have been a second instance of a foundry building – and instead used the design for that for Foundry 1 Upstairs 2 instead. I did this because after building Foundry 1 and playtesting it, I realised that Upstairs felt fairly barren, and a good way of solving that would be to merge it with Upstairs 2 which had a few of its own unique design elements (such as laser wire traps). It helped to make the floor feel more compact, and after that it felt natural to use the design for Foundry 2 for Upstairs 2 instead.
3. Final Level Flow
Below is a basic level flow for the final level and its objectives along the way. Key items are colour coordinated to show how they link together and progress the level.
Main Objective: Investigate the foundry and find out why production has halted.
Start level
v
Enter lift
v
Enter Locker Room [COLLECTIBLE]
v
Destroy enemies > Enter Shower Room > Pick up Key
v
Unlock Door in Locker Room > Enter Equipment Room > Destroy enemies
v
Go up stairs to Foundry Downstairs area [OR] Go through vent [COLLECTIBLE]
v v
Enter Break Area > Destroy enemies
v
Progress to Generator Room [COLLECTIBLE] > Destroy enemy > Pick up Key > Shoot Switch
v
Jump onto moving platform > Walk past unlocked Door
v
Unlock Door in Foundry Downstairs > Jump onto moving platform > Enter Foundry Upstairs [COLLECTIBLE]
v
Destroy enemy > Bypass laser wire traps > Destroy enemy > Enter Foundry Upstairs 2 [COLLECTIBLE]
v
Destroy enemies > Bypass laser wire traps
v
Jump onto moving platform > Shoot Switch > Jump past unlocked Door
v
Go through vent > Destroy enemy > Enter lift
v
Exit lift > Enter Level End area > Destroy enemies > Walk into Door
v
End level
I tried to make the flow work in conjunction with how a foundry layout would realistically be. This is shown throughout the logical use and order of certain areas, such as how the first area the player will encounter after getting into the lift is the Locker Room. This makes sense as the workers would have locked away their belongings and valuables here, and right next to the Locker Room is the Shower Room where they could shower before or after work. I used this logical layout of areas throughout the entirety of my level, and it shows thought into how such a location would actually be laid out.
4. In-depth Level Analysis
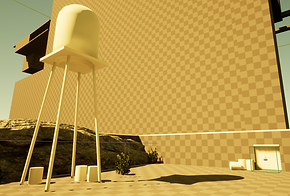
1. Start Area

2. Locker Room

3. Shower Room
Above shows the key elements for the first three areas of my level. For the Start Area I decided for it to be an open, outside area. The reason for this is because I wanted the player to get to experience the outside world briefly before entering the claustrophobic confines of the foundry. It shows a direct juxtaposition as to what is outside and what is inside and it’s reflected in the experience the player feels when transitioning from this area to the Locker Room. I also created a basic water tower and placed it in a way so that the shadow from the lighting would be pointing towards the lift doors – which is where the player needs to go. This would subliminally tell the player that the objective/way forward is over there, and this is aided by the fact it is a visually striking shadow. The Locker Room is designed to be a claustrophobic area, and as such I placed enemies behind lockers to create a basic scare for the player. I created two AI types in my level, one which is idle until they see the player – in which case they rush them, and another which is roaming on an AI path until they see the player – after which they will also rush them. The reason for this is because I wanted some enemies to be specifically placed as I felt it would aid the design more having them be in a set location. Because of this, I can then place them in a way as to best elicit a reaction from the player. The best example of this is in the next area, which is the Shower Room. I placed one of the idle enemy AI’s in a destroyed shower cubicle, and when the player enters the area they emerge from darkness and rush them on sight. This scares the player and puts them on high alert. In the Shower Room is also the green key required to unlock the green door in the Locker Room, which will then progress the player into the Equipment Room seen below.

4. Equipment Room

5. Foundry Overview

6. Break Area
Above shows the key elements for the next three areas of my level. First of all is the Equipment Room. In here there are two idle AI’s who rush the player upon entering. I wanted them to rush the player when they get into the room so that the player maintains being on high alert from the Shower Room. After destroying the enemies, the player can choose to go through the doors on the left or through the vent in the far-right corner of the room. I gave the player a choice here fairly early on to show that there are sometimes multiple ways to approach a situation. I do not think full on linearity is an enjoyable playing experience, and in modern games players like to be given options and to be rewarded for exploration – even at a basic level. With this in mind I added a collectible in the vents if the player decides to go that way, to show them that they will sometimes be rewarded for deeply exploring the level. Next is the Foundry Downstairs area (see below), and I have also added an image above (Foundry Overview) showing a brief overview of all foundry floors, including Foundry Downstairs. I wanted the main foundry workplace to be the centrepiece of the level, with foundry buckets moving around above and with it being of fairly large scale. This is evident when you first walk into Foundry Downstairs and you see how high the foundry ceiling is. I also wanted the overall foundry area to have a fair bit of natural light to contrast with the unnatural light of the previous rooms the player has been in. I felt it would be a nice visual change to keep things fresh for the player. As such, I added a gigantic hole in the roof to let in sunlight. This is also where smoke and steam would have left the main foundry area whilst work was going on. The Break Area is a fairly combat centric room, and it is where the player ends up if they go through the vent in the Equipment Room. They can also end up here by entering the room via Foundry Downstairs. I added plenty of cover points for the player here, in particular a key piece of cover for when they drop out of the vent. There are a lot of enemies in this room, and they are enemies which use the roaming AI. I wanted to mix it up for the player here, as previously they have only encountered idle AI. This shows a progression and development of enemy intelligence, and it increases the difficulty for the player through unpredictable AI patterns. This adds a new layer of challenge to the level.

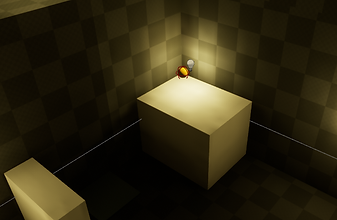
7. Generator Room

8. Foundry Downstairs

9. Foundry Upstairs
Above shows the key elements for three more areas of my level. The Generator Room is located on the other side of Foundry Downstairs, on the walkway opposite the blue locked door. When outside of the Generator Room, the player is denied entry by an unmovable red door. Further exploration shows a corridor to the left of the player, which when progressed down will lead them to the Generator Room. Here they can collect a blue key which will unlock the blue locked door at the start of Foundry Downstairs. The player has to jump down into the Generator Room from the corridor in order to retrieve the key, and in doing so they effectively lock themselves in the room with no way out. This introduces the concept of switches to the player and does so in a way where they have to figure it out due to being completely trapped. The solution is to shoot the red switch, which will unlock the red door. The player can then jump onto the moveable platform, get to where the red door was and make their way back to Foundry Downstairs. I created a basic looking wire prop within Unreal (which I then linked from the switch to the door) to further tell the player – along with the colour coordination – that interacting with the switch will also likely interact with the door as they are both connected. Once the player unlocks the blue door from Foundry Downstairs by using the blue key, they can jump onto the big box platform (which would be an empty foundry bucket when finalised) and let it take them to Foundry Upstairs, which they can then jump to. Foundry Upstairs introduces a new level mechanic to the player also, in the form of traps. The player will encounter laser wire traps as they progress along the walkway. Touching a laser wire trap will kill the player and take them back to the start of the level. Low lasers are easily avoidable by jumping, and higher lasers are avoided by crouching under them. This is shown to the player through two initial lasers being close together, showing the height distance between them both. From this, the player can figure out that they need to adjust their height in accordance with the lasers. After bypassing the lasers, the player will have to do a bit of first person platforming – by jumping on environmental props – in order to reach Foundry Upstairs 2. I added some basic platforming as it hadn’t been seen in the level yet, and I thought it would be an interesting and different way to progress to the next floor.

10. Foundry Upstairs 2 - Image 1

11. Foundry Upstairs 2 - Image 2

12. Foundry Lift Exit
Above shows the key elements for the entirety of Foundry Upstairs 2 and the Foundry Lift Exit area. Foundry Upstairs 2 consists of the original design for Foundry 2, which I ended up cutting and then incorporating the design of into here. The player has to destroy roaming AI enemies when they get to Foundry Upstairs 2, and then they will have to bypass more laser wire traps (shown in Image 1), which were introduced on the previous floor. They will then have to jump onto a moving foundry bucket platform and let it take them towards the red locked door, which is where Image 2 comes in. When reaching the door, the player may be confused as to what to do now. Looking around as they are on the platform will reveal a solution, and it harks back to switches which were introduced earlier. Above and behind some environmental props is a red switch, which is only visible when the player is on the moving platform and near the red locked door. Shooting the switch will unlock the red door, so that when the player next waits to reach it via the moving platform, they can jump off and onto the walkway. As also seen in Image 2, there is a vent before the box props that the player goes through in order to reach Foundry Lift Exit. When reaching Foundry Lift Exit, the player is rushed by an idle AI enemy. I wanted this enemy to come out of nowhere just as the player got comfortable with not facing an enemy for a short while. It keeps the player alert and on their toes. After destroying the enemy the player gets into the lift and descends down towards the Level End Area (shown below).
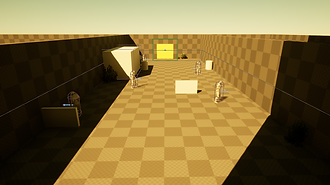
13. Level End Area
Above shows the Level End Area for my level. I wanted to make this a big, open ended container yard area as seen in my initial top down design for the level. However, in the end I decided to restrict the scope of it. Here I added a few roaming enemies, cover props and environmental props. I also added a set of yellow doors to signify that it is the end of the level. After the player has destroyed the enemies, they can walk into the yellow doors which will end the level.
BONUS: COLLECTIBLE Placement

Collectible 1

Collectible 4

Collectible 2
Collectible 3

Collectible 5
Above shows the location of collectibles in my level. Collectible 1 is located in the locker room, in the corner between a set of lockers and the wall. This collectible is fairly easy to find, which is intentional as I wanted the player to be able to find collectibles early on and to know that they exist within the level. Collectible 2 is located in the vent connecting the Equipment Room to the Break Area and is designed to reward the player for exploring and taking the less obvious path to the next location. Collectible 3 is placed in the corner on top of a box prop in the Generator Room. This collectible is less obvious to the player, and they may miss it upon first glance. After jumping down from the corridor, it is only obtainable by going onto the moving platform and jumping off it onto the box prop. This collectible is one that only the more inquisitive players will find initially. Collectible 4 is well hidden behind the path going up to Foundry Upstairs 2, and it is located in an area the player has no need to go. However, the player can end up in that area by accidentally falling off the platforms going up to Foundry Upstairs 2, and the players who explore every nook and cranny of their environment will notice the conveniently sized gap on the walkway, which will lead them to it. Collectible 5 is located on Foundry Upstairs 2, just below the switch that the player has to shoot in order to unlock the red door. This one is difficult to find as it is hidden behind props. The only players likely to initially find this collectible are players who meticulously comb the environment. The finalised content of the collectibles would be notes/items of interest that further explain the backstory of the foundry, how it came to stop production and why its staff transformed into angry violent beings.